Final Year Project
Published:
This is part of my bachelor’s thesis project under the supervision of Dr. Jerry Ying SHI Fuh.
1. Introduction
The App mainly includes four functions, which are :
- CV - Using Traditional Computer Vision Method to analyze wound image,
- DL - Using Deep Learning Method to segment the wound region from original image,
- UI - Using Kivy Framework to design the UI interface.
- More - And some other tools like PDF generation & sending via email, weather, and an AI chatbot as customer service.
The following content will introduce the individual functions of the main pages.
2. Demonstration of Overall Functions
The following is a comprehensive display of the functions of the various App modules.
2.1 Login Module
2.2 Wound Analysis System Based on OpenCV
Patient Creation & Wound Image Analysis by OpenCV
Report Sent via E-mail
Patient History Query
2.3 Wound Analysis System Based on Deep Learning
2.4 Other Functions Covered by App
3. Login Verification: Updated at 2020/02/19
Version 0.1.0
The current login page is just an empty shell with no specific functions, while the aim is to use Google authorization to achieve the function of signing up and signing in.
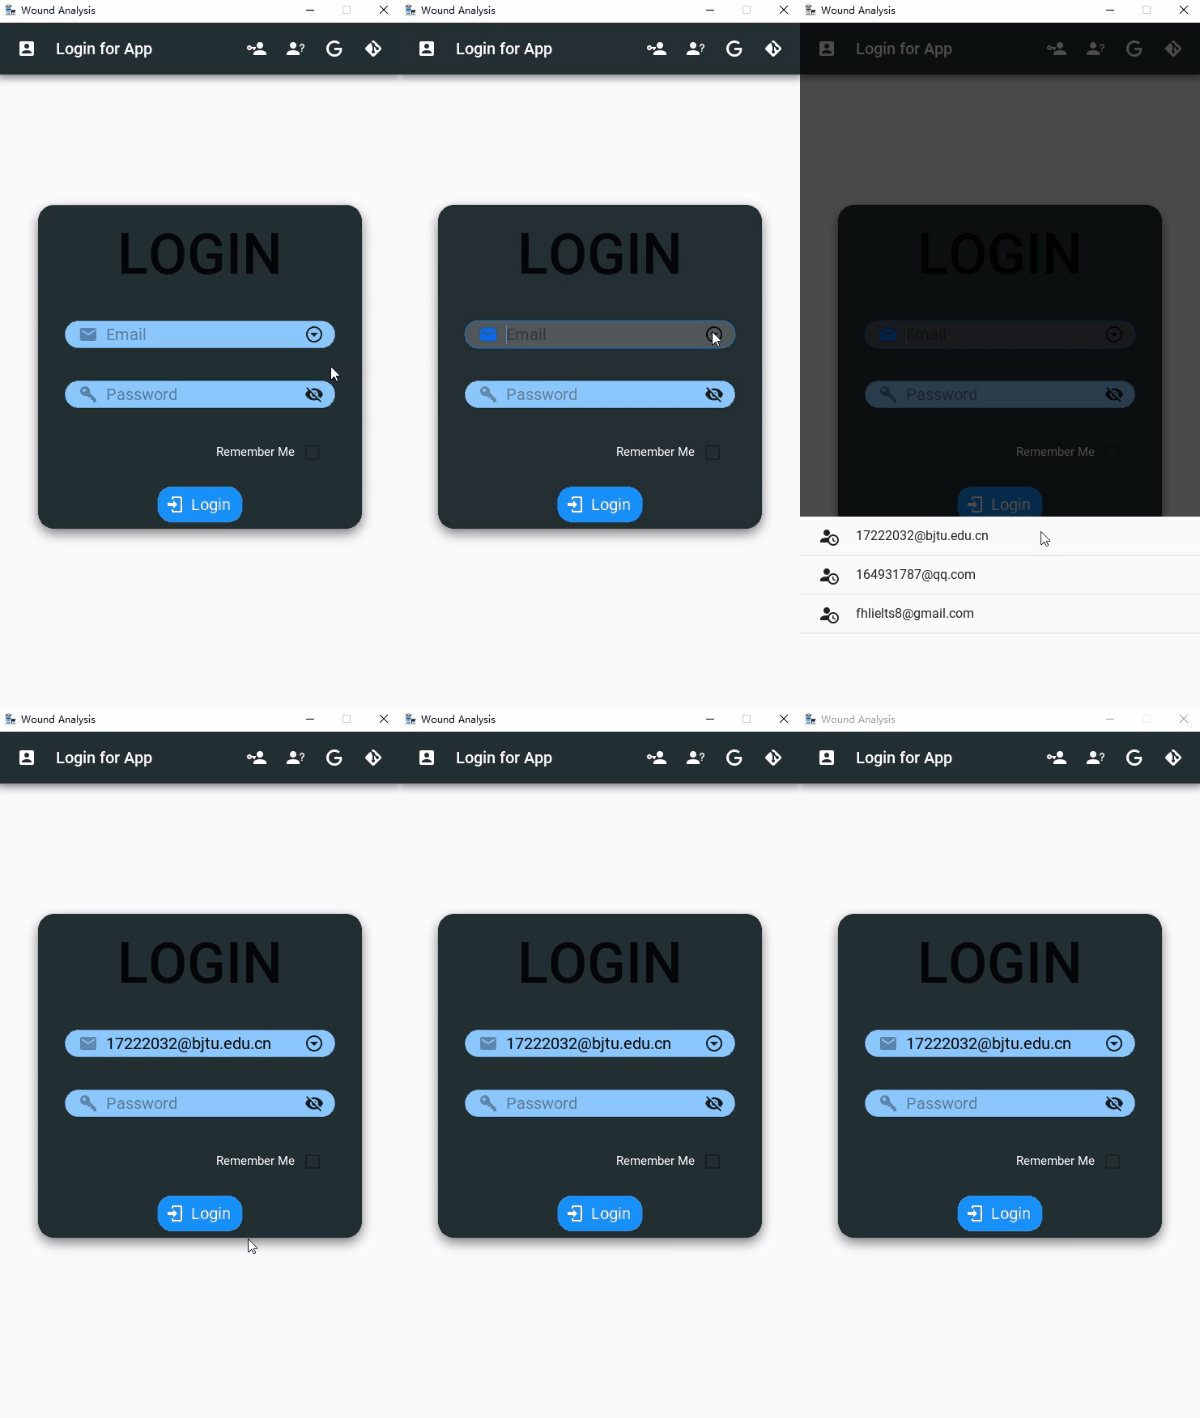
The User is supposed to type the username and corresponding password to log in to the app. The eye icon on the right can be clicked to hide the password, and the UI interface is illustrated as below:

3.1 Login Page
- Integration & Optimization of Functions such as Style Replacement - Add the original application style setting function to the setting page.
- Optimized Realization of Login Function - The original login interface has only been designed for the interface. This update adds the back-end database to realize the login function. At the same time, third-party logins such as GitHub and Facebook should be considered to simplify the database structure and load. The existing interface is shown in the figure below. The user icon in the upper left corner can create and store a new user. At the same time, this page can jump to the password recovery interface to provide password recovery services for registered users.
- Add Verification or Error Prompt - Added prompts for incorrect types, including incorrect password, input user does not exist, etc. Set the login button to the Progress Button to optimize the interface design and user experience. The detailed demo is shown below:

- Optimization of Textfield -Adjust the icon’s position on the right of the textfield, design a new FloatLayout to adjust the icon on the right to the textfield, beautify the design, and increase the user’s operability.

Optimization of Page Layout -Move the password recovery page to the Toolbar to reduce the layout items of the login page. Its icon is shown in the figure below. Click to jump to the password recovery page.
Optimization of E-mail Typing -Add a list to visit the created users. Activate the form column at the bottom by clicking the button to the right of the first textfield. Further, the user can click the corresponding user name to automatically fill it in the first textfield, simplifying the cumbersome login required.

Added Remember User Option -To reduce the tedious operation of entering a password every time a user logs in to the application, this update uses a Checkbox to change the value of Remember (BOOLEAN) in the database, so that logged-in users can use this option to avoid repeated password input. The corresponding user login password can be automatically filled in by double-clicking the text box in the password field.
Adding Login Via GitHub -Users can log in through their personal GitHub account, reducing the time it takes to register a new account. If you successfully log in through your GitHub account, record the GitHub value (BOOLEAN) as True in the database. On this basis, the password reset option of the personal page is optimized: if you log in through GitHub, the password change function will be invalid, and the user needs to go to the official GitHub website to update or reset the password.

3.2 User Register Page
The addition of the user registration function allows it to create new user personal information based on the user’s name and the email address that the user fills in. After completing the creation, you can return to the login page. And the UI interface is illustrated in the figure below:

3.3 Password Retrieve Page
This function accounts for the possibility of users forgetting their passwords. To retrieve and reset the password, users enter the email used during registration and then log in. The design of its interface is shown in the figure below.

4. Adding Patient Information
The app is designed to store patients’ information via SQLite, Python’s built-in database.
As demonstrated in the figure below, the user can click the Adding button on the navigation drawer to jump to the specified page.

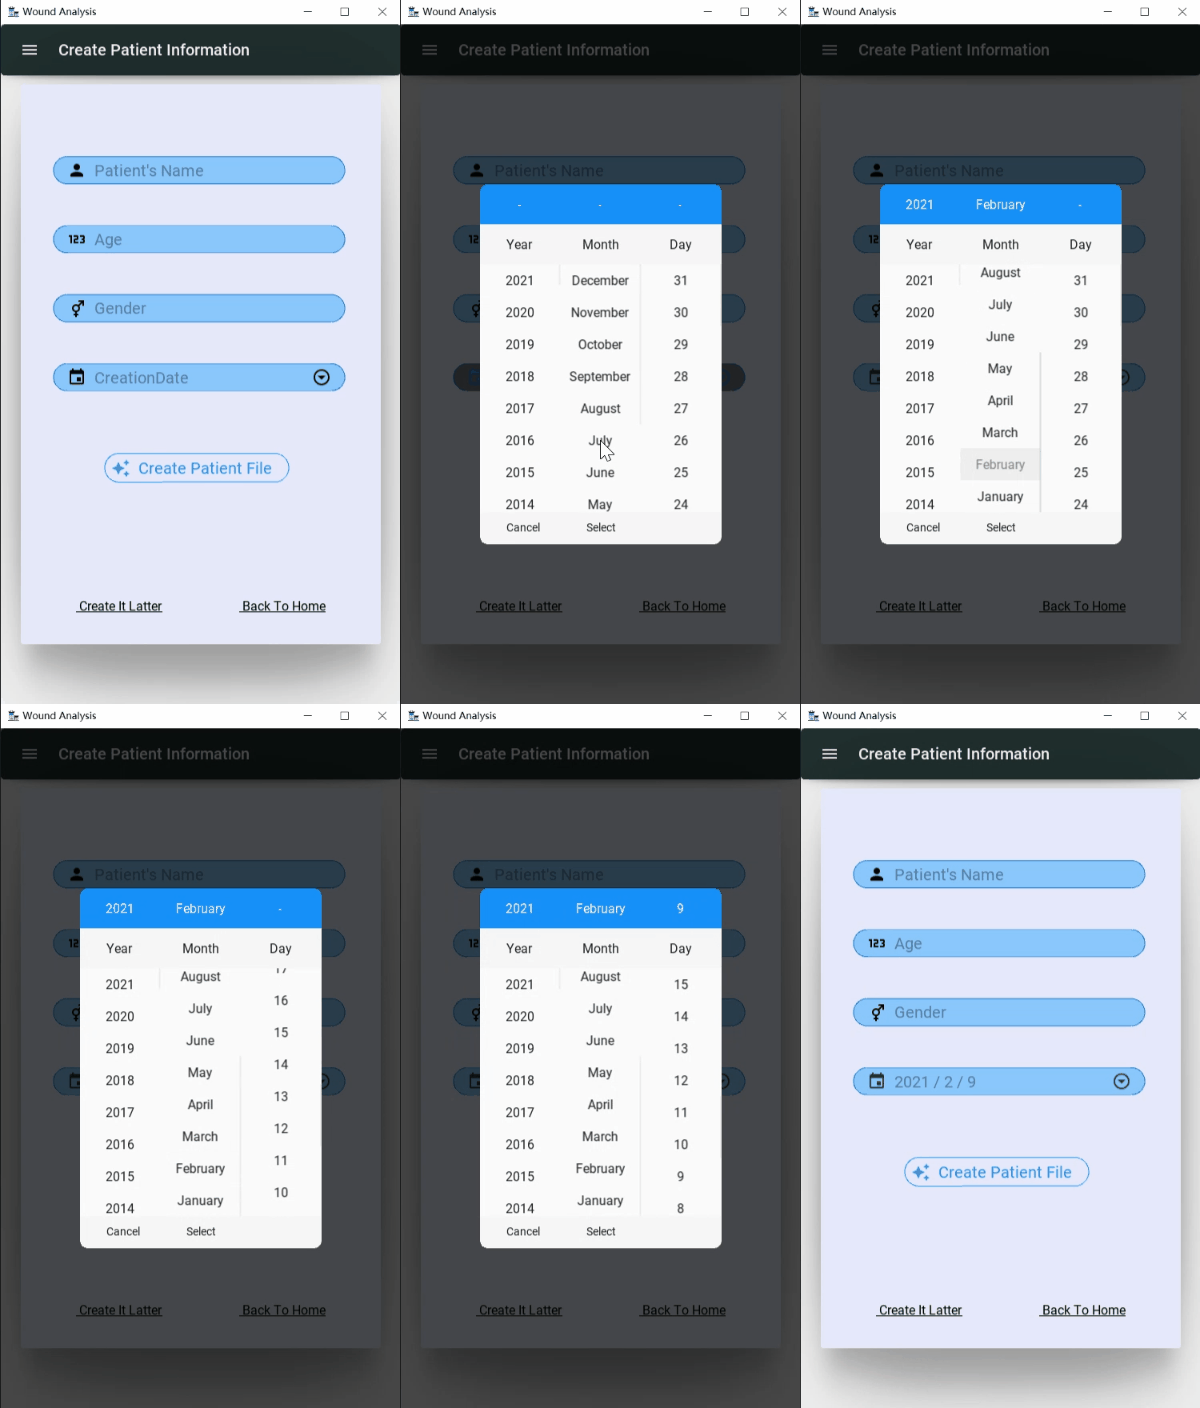
The required information is the Patient’s Name, Age, Gender, and Creation Date. You can choose the creation date using the date picker, where you should double-click the icon button.

Meanwhile, this page can be skipped directly and jump to Upload Page or Home. At present, the data is collected in a database. I am considering using Firebase to replace it in further work, as Firebase can reduce the burden on local storage.
5. Home Page
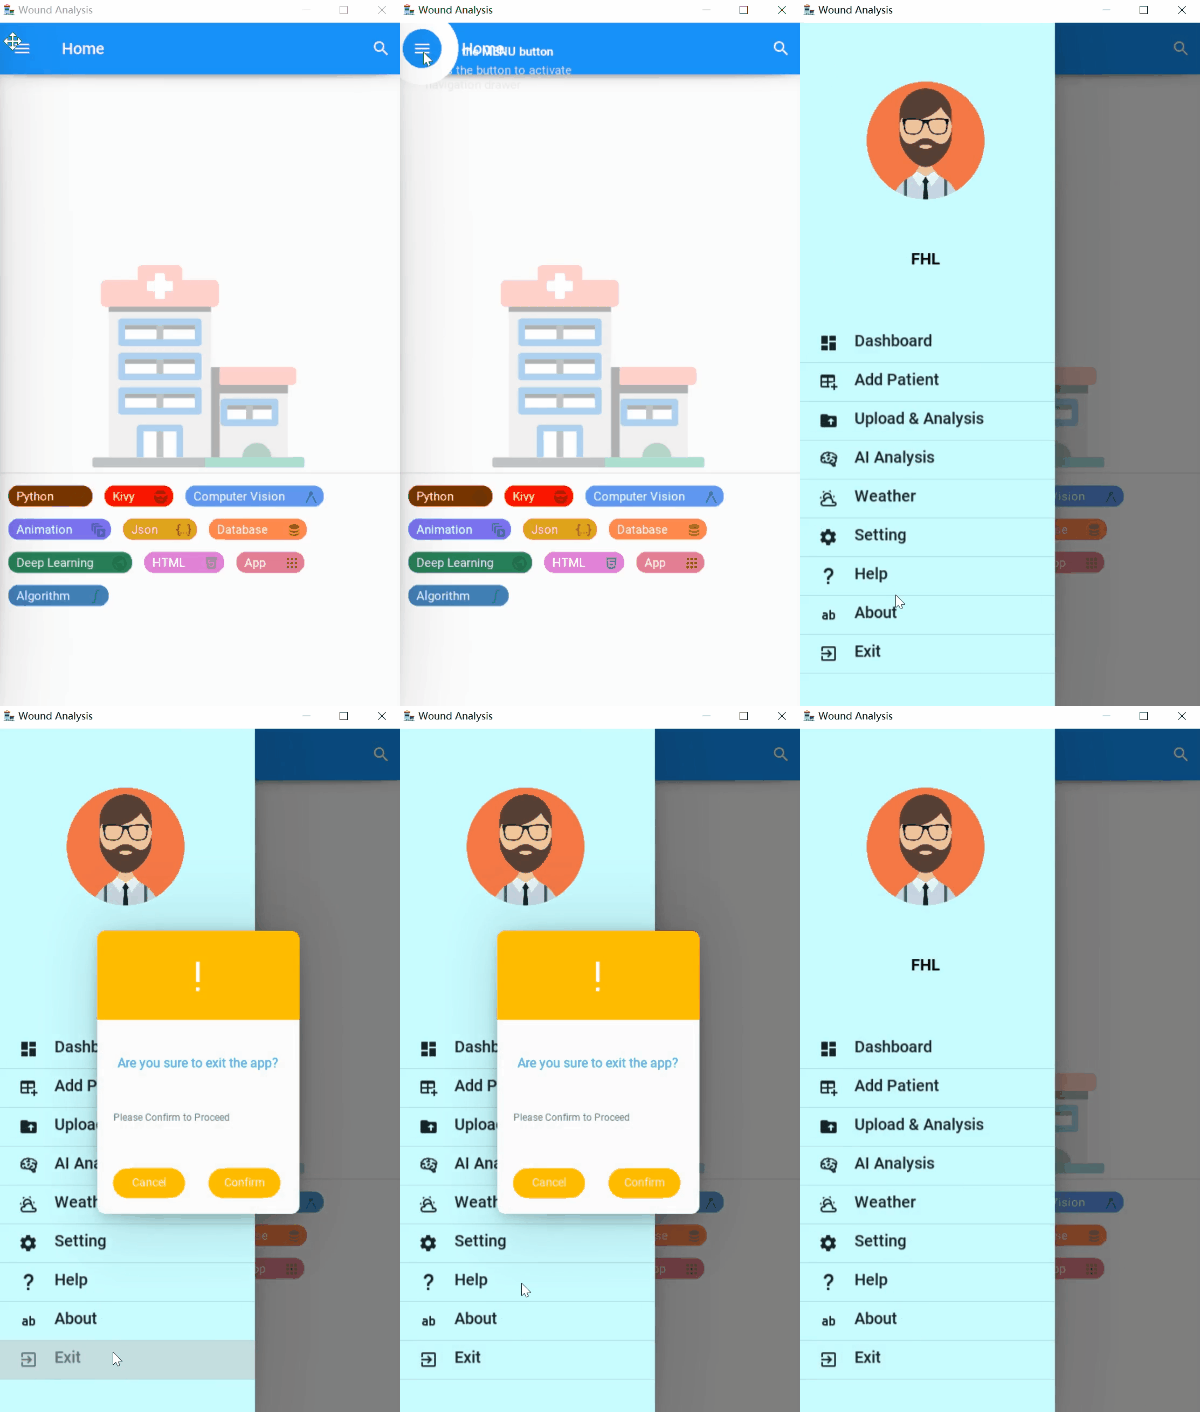
You can get to the home page after creating patient information. And the tab hint is used to guide the user in activating the navigation drawer. Meanwhile, the chips on the bottom of the home show the related knowledge and skills.
The interface of the home page is shown as follows:

You can use the navigation drawer to jump to the corresponding tab. The unique page implementation is shown in the figure below.

The chips on the Home Page can be clicked, and then you can view the relevant knowledge used in this App through the official website or Wikipedia, such as Python, Kivy, JSON, etc.

6. Upload Wound Image & Analyze
This is one of the application’s main tasks, which includes uploading wound images. The core idea is to process and analyze images based on OpenCv through traditional computer vision methods and then obtain the contour and specific characteristics of the wound.
It mainly includes three functions: taking pictures by camera, uploading local pictures /taking pictures & wound pictures to the database, analyzing and processing wound pictures.
6.1 Camera
The camera can achieve the camera function on a mobile phone, which can store the picture taken in the format”%Y%m%d%H%M%S.png”. Currently, the image is stored in a local address; I am also considering using a cloud database.
6.2 Upload Wound Image
Professional doctors will need to upload wound pictures to the database,thus this function aims to pop up a window to choose file from album in mobilephone. The former format for the user uploaded image is "uploadimage/input.png" , which is stored at the local address. After optimization, the COS is taken into practical account. The new format for the uploaded image is shown in the code below:
    create = App.get_running_app().screen_manager.get_screen('Create')
    PatientName = create.children[0].ids.PatientName.text.lstrip()
    upload_image_file_path = "uploadimage/{}_input.jpg".format(PatientName)
Meanwhile, the code used for uploading an image to the COS is also shown below:
    response=client.upload_file(
        Bucket='wound-1301658428',
        LocalFilePath=upload_image_file_path,  # Path to local file
        Key=upload_image_file_path,  # File name after uploading to the bucket
    )
6.3 Analyze Wound Image
This module is implemented as the application’s main function, which can identify the wound contour and analyze the corresponding wound characteristics. After uploading the picture, the back-end will recognize it and display the uploaded original and processed pictures on the page. On this basis, the corresponding report can be generated and sent to the mailbox. An example usage is demonstrated as follows:
 )
)
Note: If the user clicks the E-mail Button, the application will send an email with an attachment containing Wound Analysis Report to the designated mailbox(for example, xxxx@gmail.com).
A demo of the attachment is shown in the figure below:

Optimize the file management pop-up window, beautify its appearance, and increase its functional capabilities; the nature of its asynchronous processing and image analysis has not changed.

Optimized the source of the patient’s name, age, gender, etc., for wound analysis details. Originally, it was set to determine the patient’s name to obtain detailed information from the analysis. Therefore, only one line of information for the same patient can be displayed. This information has been analyzed in the previous analysis and stored in the patient information of the corresponding patient. Now it has been optimized using the following code. The realization idea is mainly based on the patient’s name as the identification, to retrieve the relevant information in the corresponding database and display it in the wound details page and the generated PDF file.
    def Name(self):
		# sql = "SELECT PatientName FROM Patient WHERE PatientName='FanHaolin'"
		# The above is the former code, which is childish
        create = App.get_running_app().screen_manager.get_screen('Create')
        PatientName = create.children[0].ids.PatientName.text.lstrip()
        sql = "SELECT PatientName FROM Patient WHERE PatientName='{}'".format(PatientName)
        res = select_data(sql)
        self.ids.name.text = str(res[0][0])
7. Wound Image Segmentation–Deep Learning
8. Patient List
This page is an important part of the realization of electronic medical records
The setting of this page is mainly to be able to access the patient’s medical records, which can be accessed by clicking the search button in the upper right corner of the Home Page, or by the History option in the Navigation Drawer. After jumping to this page, you can search for the patient’s name through the text box above to obtain detailed information about the patient. The page is displayed as follows:

- Search Function Optimization -This update adds a button click event corresponding to the patient’s name on the patient record page. Specifically, clicking the patient’s name can access their detailed medical history information. The analyzed medical history can be obtained through the Swipe Menu at the bottom of the sliding page. The next step is to add a new medical record modification function, which can be modified according to the doctor’s diagnosis. The current medical history interface is shown in the figure:

- Some Details Modification—When you click on the corresponding patient name within the patient list, the search text field will change to the patient’s name, and you can use the icon button on the right side of the text field to delete the current content.
9. Weather
The original intention of the weather module is to be used as a small life tool to provide doctors with timely weather information to deal with possible weather conditions.
The temperature of the displayed area can be selected by yourself; the default is (Singapore), and the automatic positioning function is to be developed.
Note: The Weather function is supported by [OpenWeatherMap API][5]
 Meanwhile, the button on the toolbar can go back to home or refresh the widget.
10. Personal Setting
The personal setting page now contains a name-change box, where the user can change the user name and avatar. Consider adding a theme replacement function later. The UI interface is illustrated below:

10.1 Avatar Change
The user can change their avatar by clicking on the current avatar, which will activate the avatar list. The user can also randomly choose one by clicking the image in the image list.
![]()
10.2 Dark Mode
The dark mode is set to meet users’ needs in different environments, and the mode can be switched through the switch. The schematic diagram of switching dark mode is shown below:

10.3 Password Visibility
This setting option can be used to set the password’s visibility. Currently, this setting is mainly for the login verification interface.
10.4 Password Reset
This function provides a password reset option for successfully logged-in users. When the old password is inconsistent with the original, the new password is stored in the corresponding user information in the database. This function also considers using Firebase as storage in subsequent iterations of the database. For specific operations, please follow the pop-up prompts and confirm.

10.5 Logout Current Account
The logout function will log out of the current login account and jump to the login page. This function allows the application to use multiple accounts and store user information separately and independently.
11. Help Page
The help page contains a chatbot that can answer users’ questions. The chatbot can answer questions like:
- How are you
- How to upload
- How to use AI
- How to add
- What are you doing The figure below shows some example usages of the help page:

12. Exit App
To ensure the user’s convenience, the application has set up an exit button, and before the user confirms the exit, a pop-up prompt will be displayed to continue. For example, the following GIF shows the specific operation process

